Studies show that 72% of shoppers form their first impression of a product from its label alone. When you want to print custom labels for jars at home, you control that impression completely. Homemade jam, bath salts, spice blends, candles — a clean, professional label transforms any plain glass container into a branded product. Our full collection of printing tips and guides covers the entire home printing spectrum, but this guide focuses on jar and bottle labels specifically.
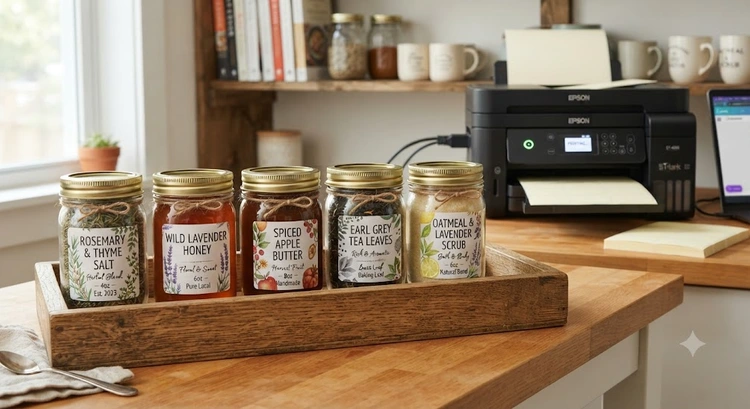
You do not need a commercial printing service or expensive machinery. A standard inkjet or laser printer, the right label stock, and free design software are enough to produce labels that look store-bought. The total startup cost for a basic home label setup runs between $30 and $80.
This guide covers quick wins, a full step-by-step walkthrough, material comparisons, beginner versus advanced setups, pro techniques, and the most common mistakes beginners make. By the end, you will know exactly what to buy, how to configure it, and how to avoid the errors that waste entire sheets of label stock.
Contents
- The Fastest Ways to Get Results Right Now
- How to Print Custom Labels for Jars at Home, Step by Step
- Home Label Printing: Benefits and Real Trade-offs
- Beginner vs. Advanced Label Printing Setups
- Label Material Options Compared
- Pro Techniques That Elevate Every Label You Print
- Label Printing Mistakes That Cost You Supplies
- Frequently Asked Questions
- Final Thoughts

The Fastest Ways to Get Results Right Now
What You Already Have at Home
Most households already own the core tool. Any inkjet printer that handles photo paper handles label sheets. You likely have design software too. The only missing piece for most beginners is label stock itself.
- Check that your printer supports at least 1200 dpi (dots per inch) output
- Confirm your ink is pigment-based — it resists water better than dye-based ink
- Measure your jars before ordering — height and circumference determine label size
- Round labels work best for lids; rectangle labels suit jar sides
- A sheet of 30 standard labels costs $0.30–$0.80 at most office supply stores
Quick-Start Design Tools
Free software gets you professional results fast. You do not need to purchase anything.
- Avery Design & Print — matches label sheet templates exactly, fastest for beginners
- Canva — drag-and-drop templates, exports as PDF or PNG at print resolution
- Google Slides — precise sizing, completely free, exports to PDF
- Microsoft Word — built-in label wizard covers most standard Avery sheet sizes
Avery Design & Print is the fastest entry point. It pre-loads exact dimensions for over 400 label sheet formats and eliminates alignment guesswork entirely.
How to Print Custom Labels for Jars at Home, Step by Step
Step 1 — Choose Your Label Stock
Label stock is the most important variable in the entire process. The wrong material produces labels that peel, smear, or fade within days. Match your material to your storage conditions before purchasing anything.
- Matte paper labels — cheapest, good for dry pantry storage, zero water resistance
- Glossy paper labels — vibrant color, still not waterproof, ideal for gifts
- White vinyl labels — water-resistant, flexible, best for refrigerated jars and bottles
- Clear vinyl labels — water-resistant, creates a "no-label" look on glass
- Polyester labels — most durable, withstands oils, heat, and temperature swings
For anything stored near water, oils, or in a refrigerator, read the complete guide on how to print waterproof labels at home before purchasing your stock.
Pro Tip: Always buy a small test pack before ordering in bulk — printer compatibility varies by label brand and stock thickness, and one bad batch wastes money.
Step 2 — Design Your Label
Set your canvas dimensions to match the label sheet exactly. Use the exact width and height printed on the label product packaging.
- Limit fonts to two maximum — one for the product name, one for details
- Leave a 0.125-inch (3mm) bleed margin around every edge
- Use high-contrast color combinations — dark text on a light background reads best at small sizes
- Export your finished design as a PDF at 300 dpi for clean, sharp print output
- Avoid thin fonts below 8pt — they fill in or disappear on label stock
If you are working in Word, our step-by-step guide to printing labels from Word walks through the exact label wizard setup process from start to finish.
Step 3 — Set Up Your Printer
Printer settings control output quality directly. Incorrect settings waste label sheets and ink. Confirm each setting before sending the file to print.
- Set paper type to "Labels," "Glossy," or "Heavy Paper" — whichever matches your stock type
- Set print quality to "Best" or "High" — never use "Draft" on label stock
- Disable "Fit to Page" and print at 100% actual size
- Run a test print on plain paper first, then hold it against the label sheet to verify alignment
- Load one sheet at a time through the manual feed tray when available
Step 4 — Print, Cut, and Apply
Once you confirm alignment with a plain paper test, feed the label sheet as directed by your printer manual. Most inkjet printers specify which side of the paper faces up in the tray.
- Let labels air dry for 60 seconds after printing — do not stack wet sheets
- Use a paper trimmer for straight cuts on full-sheet blanks
- Clean jar surfaces with rubbing alcohol before applying — oils destroy adhesion
- Apply labels to room-temperature jars — cold glass causes air bubbles under the label
- Smooth from the center outward with a credit card or squeegee to eliminate bubbles
- Wait at least one hour before refrigerating newly labeled jars
Home Label Printing: Benefits and Real Trade-offs
The Clear Benefits
Home label printing delivers real, measurable advantages over ordering from a commercial print shop.
- Cost: A sheet of 30 labels costs $0.30–$0.80 versus $1–$3 per label from commercial printers
- Speed: Design, print, and apply labels the same day — no shipping delays
- Control: Change the design instantly for seasonal batches, special gifts, or product updates
- Quantity: Print exactly the number you need — no minimum orders, no wasted overruns
- Privacy: Keep recipes and formulations off third-party printers entirely
The Honest Limitations
Home printing has real constraints. Knowing them upfront prevents frustration later.
- Home printers cannot match commercial UV-cured or professionally laminated finishes
- Pigment inks still fade faster than industrial offset printing on long shelf-life products
- Die-cut shapes (circles, ovals, custom outlines) require a cutting machine or careful hand cutting
- Large batches of 500 or more labels become time-consuming and hard on inkjet cartridges
Warning: If your jars will be refrigerated, washed, or stored near oils or humidity, paper labels will peel within days — vinyl or polyester stock is not optional in those conditions.
According to FDA food labeling guidelines, any product sold commercially must include specific required information. If you plan to sell your products, review those requirements before finalizing any label design.
Beginner vs. Advanced Label Printing Setups
The Beginner Setup
You can print custom labels for jars at home for under $50 using equipment you may already own. This setup handles small batches perfectly — holiday gifts, farmers market products, home pantry organization.
- Printer: Any inkjet with 1200 dpi or higher — Canon PIXMA or Epson EcoTank series both perform well
- Label stock: Avery 8160 matte white label sheets (30 labels per sheet)
- Software: Canva free tier or Avery Design & Print online tool
- Cutting: Standard scissors or a basic 12-inch paper trimmer ($12–$20)
Total startup cost for this setup: $20–$50 depending on whether you already own an inkjet printer.
The Advanced Setup
Scaling up production, adding premium finishes, or printing custom shapes requires a significant equipment upgrade — but the results match commercial output closely.
- Printer: A dedicated thermal label printer like the Zebra ZD220 for monochrome shipping-style labels, or a color laser printer for high-volume color output
- Cutting machine: Cricut Maker or Silhouette Cameo for precise die-cut label shapes
- Label stock: Waterproof vinyl rolls or polyester sheets on a roll feeder
- Laminator: Cold laminating pouches add gloss and full waterproofing over inkjet prints without heat
A full advanced setup runs $250–$600 total. At that investment level, the per-label cost drops significantly for batches over 100 units.
Label Material Options Compared
Paper vs. Vinyl vs. Polyester
| Material | Water Resistance | Print Quality | Cost per Sheet | Best For |
|---|---|---|---|---|
| Matte Paper | None | Good | $0.10–$0.30 | Dry pantry, gift jars |
| Glossy Paper | None | Excellent | $0.15–$0.40 | Gift sets, dry storage |
| White Vinyl | High | Excellent | $0.40–$0.80 | Refrigerated jars, bath products |
| Clear Vinyl | High | Excellent | $0.50–$1.00 | Glass bottles, "no-label" look |
| Polyester | Very High | Excellent | $0.60–$1.20 | Candles, oils, outdoor use |
Which Material Matches Your Project
Do not default to paper just because it costs less. Match material to environment first.
- Jam and preserves stored in the pantry: Matte or glossy paper works fine
- Sauces, condiments, or anything refrigerated: White vinyl only
- Candles and bath salts: Polyester withstands heat and oil exposure
- Cocktail bitters and tinctures in glass bottles: Clear vinyl preserves the glass aesthetic
- Water bottles for outdoor or gym use: Polyester with pigment-based ink
Pro Techniques That Elevate Every Label You Print
Color and Contrast Rules
Color choices affect readability, print accuracy, and how labels age on the shelf. Follow these rules consistently.
- Design in CMYK color mode, not RGB — printers work in CMYK, and RGB-to-CMYK conversion shifts colors unpredictably
- Avoid pure white text on light-colored backgrounds — add a thin dark outline or drop shadow for legibility
- Limit your palette to 2–3 colors maximum — more colors increase ink bleed risk on label stock
- Test print a single label before running a full sheet — one test saves 29 wasted labels
- Check your design against the actual jar color before finalizing — ink looks different on colored glass than on a white screen
Finishing Touches That Make the Difference
Small final steps separate amateur labels from professional-looking ones. None of these require extra equipment beyond basic tools.
- Apply a cold laminating sheet over printed paper labels — adds waterproofing, gloss, and significantly extends label life
- Use a corner rounder punch on rectangle labels — rounded corners resist peeling far longer than sharp corners
- Let labels cure at room temperature for 24 hours after application before refrigerating
- Write batch dates on the reverse side with a permanent marker rather than reprinting entire batches for small updates
Pro Tip: If your prints consistently run dark and saturated, dial your printer's color density down by 10–15% — inkjet printers absorb more ink into label stock than plain paper, and the difference shows in the final color.
Label Printing Mistakes That Cost You Supplies
Design Errors
Most failed home label projects trace back to design mistakes, not printer problems. Catch these before you print.
- Wrong dimensions: Designing at the wrong canvas size wastes an entire sheet. Confirm exact label measurements against your product packaging before opening design software.
- Low-resolution images: Artwork below 150 dpi prints blurry. Use 300 dpi minimum for every graphic element, including logos.
- No bleed margin: Without a 3mm bleed zone around the edge, cutting produces white borders. Set bleed in your software before designing anything else.
- Overcrowded layouts: Label space is limited. Cut any copy that is not essential — product name, key detail, and contact or batch info are enough.
Print and Application Errors
Even a well-designed label fails if you print or apply it incorrectly.
- Wrong paper orientation in tray: Most label sheets print on one side only. Loading the sheet incorrectly prints on the backing paper and wastes the sheet entirely.
- Applying to oily or wet surfaces: Clean every jar with rubbing alcohol before applying any label. Oil and moisture destroy adhesive contact within hours.
- Skipping the plain-paper test: One test print on plain paper takes two minutes and confirms alignment before committing a full label sheet.
- Refrigerating immediately after application: Cold temperatures cause label edges to lift before the adhesive fully bonds. Wait at least one hour at room temperature first.

Frequently Asked Questions
What is the best printer to print custom labels for jars at home?
An inkjet printer with at least 1200 dpi resolution and pigment-based ink delivers the best home results. The Canon PIXMA TR8620 and Epson EcoTank ET-2800 are popular, reliable choices for label printing. For high-volume label production, a dedicated thermal label printer becomes more cost-effective over time.
Can I print waterproof jar labels at home?
Yes. Use waterproof vinyl or polyester label stock instead of standard paper, paired with pigment-based inkjet ink. Alternatively, cold laminating film applied over printed paper labels adds a waterproof barrier for a fraction of the cost of specialty stock. For full details, see our guide on how to print waterproof labels at home.
What free software works best for designing jar labels?
Avery Design & Print is the fastest option for beginners because it pre-loads exact dimensions for hundreds of standard label sheet formats. Canva works well for more creative, branded designs. Microsoft Word covers basic label needs using the built-in label wizard under Mailings > Labels.
How do I stop labels from peeling off glass jars?
Clean the glass surface with rubbing alcohol and let it dry completely before applying any label. Apply labels at room temperature, smooth from the center outward, and wait at least one hour before refrigerating. Using vinyl or polyester stock instead of paper also dramatically improves long-term adhesion.
What label stock works best for canning jars?
Matte paper labels are sufficient for pantry-stored jams and preserves at room temperature. For refrigerated items or anything that will be washed, white vinyl is the correct choice. Vinyl adhesive maintains strong contact in humid and cold environments where paper labels detach within a week.
How do I print labels from Word that align correctly?
In Word, go to Mailings > Labels, select your Avery label product number, and enter your label dimensions. Always print a test page on plain paper first and hold it against the label sheet to verify alignment before printing on the actual stock. Our step-by-step guide to printing labels from Word covers the full process in detail.
How do I prevent ink from smearing on label stock?
Let labels air dry for at least 60 seconds after printing before touching or stacking them. Switching from dye-based to pigment-based inkjet ink significantly reduces smear risk on all label materials. Applying a cold laminating sheet over the finished print adds a permanent protective barrier against smudging, moisture, and light scratches.
What label size fits standard mason jars?
Regular mouth mason jars (Ball or Kerr brand) fit side labels approximately 3.5 inches wide by 2 inches tall. Wide mouth jars accommodate 4 inches wide by 2.5 inches tall. Lid labels work best at 2.5 to 3 inches in diameter. Always measure your specific jar before designing — dimensions vary across brands and jar sizes.
Final Thoughts
You now have everything you need to print custom labels for jars at home — the right materials, printer settings, design rules, and a clear list of mistakes to sidestep. Start with a free account on Avery Design & Print, grab a test pack of vinyl label sheets, and run your first alignment check on plain paper before committing to a full sheet. One small test batch reveals everything you need to adjust, and from there, every label you produce gets sharper, faster, and more professional.



About Chris & Marry
Chris and Mary are a couple with a shared background in graphic design and print production who have spent years working with printers across creative and professional contexts — from art printing and photo output to label production and professional document work. Their combined experience evaluating printer performance, color accuracy, and paper handling across inkjet and laser platforms gives them a practical, hands-on perspective on what makes a printer worth buying. At ShopChrisAndMary, they cover printer reviews, buying guides, and recommendations for artists, photographers, and professional users.
Time to get FREE Gifts. Or latest Free printers here.
Disable Ad block to reveal all the info. Once done, hit a button below