Over 100 million people use Mac computers every day, yet most of them have never clicked a single setting beyond the default Print button — and that costs real ink, real paper, and real frustration. Knowing how to print on Mac the right way, with the right settings for the right job, fixes all of that immediately. Our printing tips section has dozens of guides like this one if you want to keep going after you're done here.
macOS makes printing genuinely approachable. It supports almost every printer brand out of the box, handles both wired and wireless setups, and gives you precise control over paper size, quality, and layout — all from a single dialog. The catch: most of those controls hide behind a small "Show Details" button that the majority of users never click.
This guide covers the full picture. You'll learn how Mac's print system actually works, follow step-by-step walkthroughs for real printing situations, discover every available printing method, and pick up both beginner basics and advanced techniques you can use today.
Contents
Understanding Mac's Built-In Print System
How macOS Talks to Your Printer
macOS uses CUPS (Common Unix Printing System) as its print backbone — an open-source print server that Apple has developed and maintained for years. You can read the full technical background on Wikipedia. In plain terms, CUPS acts as the go-between that translates your print request into a language your specific printer understands.
Here's what that means for you in practice:
- When you press ⌘P, macOS hands your request off to CUPS in the background.
- CUPS checks which printer driver is installed for your device.
- It converts your document into the right format — PostScript, PDF, or raster data — and sends it to the printer.
- Your job appears in a print queue you can monitor directly from the Dock.
Different printers process that data differently. If you're shopping for a new printer and aren't sure which technology suits your workflow, our guide to types of printers breaks down inkjet, laser, thermal, and dot matrix in plain language.
Connecting Your Printer for the First Time
macOS often detects printers automatically via AirPrint (Apple's wireless printing protocol) or when you plug in a USB cable. Here's how to add one manually if it doesn't appear on its own:
- Open System Settings (called System Preferences on older Macs).
- Click Printers & Scanners.
- Click the + button at the bottom of the printer list.
- Select your printer — macOS installs the driver automatically if one is available.
- Click Add and you're done.
If your printer doesn't appear in the list, download the manufacturer's driver from their website and run the installer before trying again.
Step-by-Step: How to Print on Mac in Real Situations
Printing a Document from Any App
No matter which app you're in — Pages, Word, Safari, Preview, Finder — the core process for how to print on Mac is the same every time:
- Open the document or file you want to print.
- Press ⌘P, or go to File → Print.
- Confirm your printer is selected in the Printer drop-down at the top of the dialog.
- Set the number of copies and your page range.
- Click Show Details — this unlocks paper size, orientation, quality, and color settings.
- Adjust what you need, then click Print.

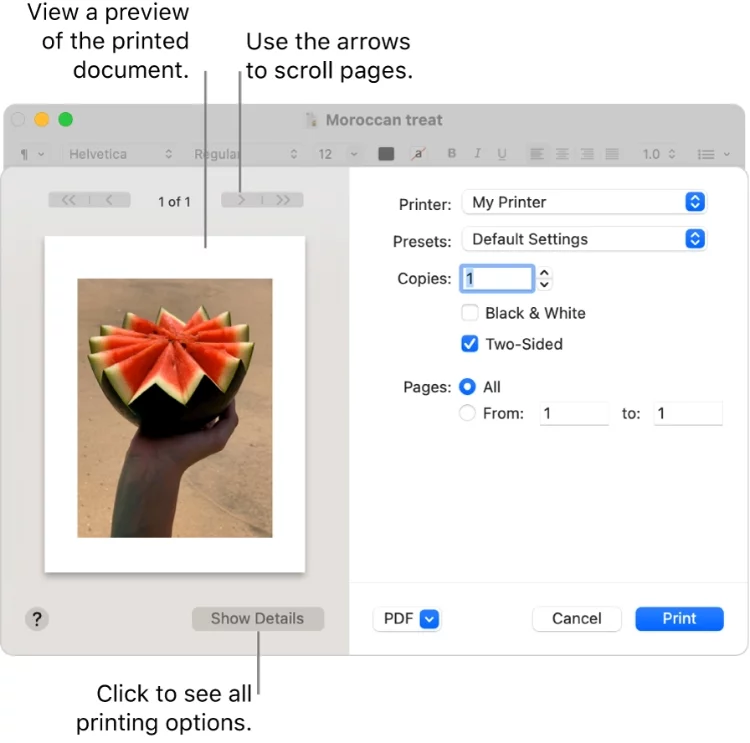
Pro tip: Always click "Show Details" before you print — the collapsed view hides critical settings like paper type and print quality that directly affect your output.
If you frequently print documents that don't match your default paper size — like needing to shrink a Word document from legal size to letter size — set a custom page size in the Paper Size drop-down to stop cutting off content.
Printing Photos on Mac
Photo printing rewards careful settings. The quality of your output depends as much on what you select in the dialog as it does on your printer hardware.
- Open your photo in Preview or the Photos app.
- Press ⌘P to open the Print dialog.
- Under Paper Size, select the exact media size you have loaded.
- In the printer options panel, set media type to Photo Paper or Premium Glossy.
- Set print quality to Best or High.
- Leave Color Matching set to ColorSync unless your printer's manual says otherwise.
If you're switching over from a Windows machine, the Mac photo printing workflow differs in a few key ways — see our breakdown of printing photos in Windows 10 for a direct comparison.
Printing Wirelessly
Wireless printing is one of macOS's biggest strengths. If your printer supports AirPrint, you need zero setup — connect both devices to the same Wi-Fi network and the printer appears automatically in every Print dialog on your Mac.
For older printers that don't support AirPrint, you can still go wireless by routing the connection through your router. Our step-by-step walkthrough on how to use a router to make your printer wireless covers exactly how to set that up.
Every Way You Can Print from a Mac

USB, Wi-Fi, and Network Printing
macOS supports multiple connection types. Each one has its ideal situation:
| Connection Type | Best For | Setup Difficulty | Speed |
|---|---|---|---|
| USB (direct) | Home desks, maximum reliability | Easy — plug and go | Fast |
| Wi-Fi via AirPrint | Homes and small offices, modern printers | Easy — auto-detected | Fast |
| Wi-Fi via driver | Older printers without AirPrint | Medium — needs driver install | Fast |
| Shared network printer | Office environments | Medium — needs network config | Medium |
| Bluetooth | Portable and mobile printers | Easy | Slow |
For specialty print jobs like postcards, greeting cards, or small-format media, the connection type matters far less than having the right printer loaded with the right paper. Our guide to printing postcards has printer-specific recommendations for that use case.
Printing to PDF
Mac's built-in PDF printer is one of its most underused features. You don't need Acrobat, a subscription, or any third-party tool.
- Open the Print dialog with ⌘P.
- Click the PDF button in the bottom-left corner.
- Choose Save as PDF.
- Name the file, pick a save location, and click Save.
This works in every single app on your Mac. It's the fastest way to create a portable, perfectly formatted document without using a sheet of paper — great for proofing before you commit to a physical print run.
Warning: Always preview the PDF before sending it to a physical printer — a mismatched paper size can silently crop content and waste an entire print job.
When to Adjust Your Print Settings (and When to Skip It)
Settings Worth Changing
Not every job needs custom settings. But these are the ones that genuinely change your output — and when to touch them:
- Paper Size — Change this any time you're not printing on standard letter (8.5×11). Always match it to whatever is physically loaded in your tray. If you print certificates or awards on non-standard stock, it helps to have a printer built for it — check our guide to the best printer for certificate printing.
- Print Quality — Use Draft for internal drafts, Normal for everyday use, and Best only for photos, presentations, or anything where quality is visible at a glance.
- Color vs. Black & White — Switch to grayscale for any text-heavy document. You'll save color ink and speed up the job.
- Two-Sided Printing — Turn duplex on for multi-page documents. It cuts paper use in half. If your current printer doesn't support it, our roundup of the best duplex scanning printers is worth a look.
- Copies and Page Range — Set these before every print job to avoid expensive reprints.
Settings You Can Usually Leave Alone
Some settings look important but rarely need to be touched:
- Scheduler — Only relevant in busy shared-printer office environments.
- Scale to Fit (under Paper Handling) — Leave this off unless your document genuinely doesn't match the paper size.
- Cover Page — Only useful on networked printers where jobs from multiple users get mixed up.
- Color Matching — Leave it on ColorSync. Only change this if your printer manufacturer explicitly recommends switching to in-printer color management.
The practical rule: always click Show Details, scan for what matters, change what you need, and print. That takes under ten seconds and prevents most printing mistakes.
Beginner Basics vs. Advanced Mac Printing Techniques
What Every Beginner Should Know
Start here if you're new to printing on Mac. These are the foundations:
- ⌘P opens the Print dialog in every app — this shortcut is worth memorizing immediately.
- Always confirm the correct printer is selected in the Printer drop-down, especially if you have more than one installed.
- Default settings (letter paper, normal quality, color) work fine for everyday documents — don't overthink it.
- If a job gets stuck, click the printer icon in your Dock and delete the stuck job manually from the print queue.
- macOS saves your last-used settings per app — your Pages settings won't affect your Safari print settings.
Advanced Techniques for Power Users
Once you have the basics mastered, these techniques give you meaningful control and save real time on repeat jobs:
- Build custom presets — Configure your perfect settings for a specific job type (say, 4×6 borderless photo, best quality, glossy paper), then save it as a named preset. One click applies everything next time.
- Print multiple pages per sheet — Open the Layout panel in Print and set Pages Per Sheet to 2, 4, or more. Essential for proofing drafts and printing handouts efficiently.
- Use the Print dialog preview — The thumbnail in the bottom-left catches orientation errors, wrong page ranges, and cropped content before you waste paper.
- Print directly from Finder — Right-click any compatible file and choose Print from the context menu. No need to open an app first.
- Manage the print queue actively — Go to Printers & Scanners, click Open Print Queue, and you can pause the queue, reorder jobs, or delete stuck items without restarting anything.
Advanced users who go beyond standard paper — printing waterproof labels, specialty media, or craft projects — will find the same Mac Print dialog handles those jobs with the right printer and settings in place. Our guide on printing waterproof stickers is a solid example of how Mac printing extends to specialty media without any extra software.
Frequently Asked Questions
Why isn't my printer showing up on my Mac?
Your printer is most likely not on the same Wi-Fi network as your Mac, or it needs an updated driver. Go to System Settings → Printers & Scanners and click the + button to see if it appears. If it doesn't, download the latest driver from the manufacturer's website, install it, and try adding the printer again.
How do I print double-sided on a Mac?
Press ⌘P to open the Print dialog, click Show Details, and look for a Two-Sided checkbox or a Layout panel with a Two-Sided drop-down. Choose Long-Edge Binding for portrait documents and Short-Edge Binding for landscape. Not every printer supports automatic duplex — check your printer's spec sheet if the option is grayed out.
Can I print wirelessly on Mac without AirPrint?
Yes. Install the official driver from your printer manufacturer's website, then add the printer via System Settings → Printers & Scanners. As long as your Mac and printer are on the same network, it will appear wirelessly in every Print dialog. You can also route a USB printer through your router to share it across devices.
How do I save a document as a PDF on Mac?
Open the Print dialog with ⌘P, click the PDF button in the bottom-left corner, and select Save as PDF. This option is built into macOS and works in every app — no third-party software needed. The PDF preserves your exact layout and page size for sharing or printing later.
Why is my print quality low even when I select Best quality?
The most common causes are the wrong media type selected in the printer options panel, a clogged printhead, low ink levels, or using plain paper when the job requires photo or specialty paper. Run your printer's built-in nozzle check and cleaning cycle first, then recheck the media type setting in the Print dialog before printing again.
How do I cancel a stuck print job on Mac?
Click the printer icon in your Dock while printing is active to open the print queue window. Select the stuck job and click the X button to remove it. If the printer has already received the data, you may also need to cancel the job directly from the printer's own control panel or display screen.
How do I reuse my print settings without setting them up every time?
Configure all your settings exactly as you want them in the Print dialog, then click the Presets drop-down at the top and choose Save Current Settings as Preset. Give it a clear name — like "4x6 Photo Glossy Best" — and click OK. Select that preset from the drop-down any time you print a similar job and every setting applies instantly.
Key Takeaways
- Knowing how to print on Mac starts with a single shortcut — ⌘P opens the Print dialog in every app on your system, every time.
- Always click Show Details in the Print dialog to access paper size, quality, color mode, and duplex settings that the default collapsed view hides.
- macOS supports USB, AirPrint Wi-Fi, driver-based Wi-Fi, Bluetooth, and shared network printing — pick the connection type that fits your workspace and printer.
- Save custom presets for repeat jobs — photo printing, certificate printing, draft mode — so your ideal settings apply in one click without reconfiguring anything.


About Chris & Marry
Chris and Mary are a couple with a shared background in graphic design and print production who have spent years working with printers across creative and professional contexts — from art printing and photo output to label production and professional document work. Their combined experience evaluating printer performance, color accuracy, and paper handling across inkjet and laser platforms gives them a practical, hands-on perspective on what makes a printer worth buying. At ShopChrisAndMary, they cover printer reviews, buying guides, and recommendations for artists, photographers, and professional users.
Time to get FREE Gifts. Or latest Free printers here.
Disable Ad block to reveal all the info. Once done, hit a button below