Ever stared at a stack of pristine wedding envelopes and wondered whether your home printer is actually going to cooperate — or just jam on the third one? You're not the only one. Knowing how to print wedding envelopes cleanly comes down to three things: the right template setup, the right printer settings, and a dry run before you touch a single real envelope. Get those right, and the rest falls into place quickly.
Wedding envelopes are the very first thing guests hold when your invitation arrives. A crisp, cleanly addressed outer envelope signals care and attention — which is exactly what a wedding deserves. Smudges, crooked text, or misaligned addresses can undermine all the work you've put into selecting your stationery. The good news: most modern inkjet and laser printers handle standard envelope sizes reliably, and the learning curve is short once you understand what matters.
Whether you're printing 40 envelopes for a small garden ceremony or 350 for a large formal reception, this guide walks you through every stage — from understanding envelope types and printer compatibility to managing large batches and fixing problems mid-run. For more specialty paper projects, our roundup of art and craft printers covers machines purpose-built for exactly this kind of creative work.
Contents
- Understanding Wedding Envelope Printing
- Your Pre-Print Checklist: Fast Wins Before You Start
- Building a Reliable Wedding Envelope Printing Workflow
- Keeping Your Printer Ready for the Job
- Solving Common Wedding Envelope Printing Problems
- Wedding Envelope Printing Mistakes to Avoid
- Frequently Asked Questions
- Next Steps
Understanding Wedding Envelope Printing
Before you load a single envelope into your printer, it pays to understand what you're working with. Wedding envelopes vary in size, paper weight, texture, and flap style — and each of those variables affects how they behave in a printer. Taking five minutes to understand the basics now prevents wasted envelopes and frustration later.
Envelope Types and Sizes
The most common wedding invitation envelope sizes are:
- A7 (5.25" × 7.25") — The go-to outer envelope for standard A7 invitations. Most popular for formal weddings. Our dedicated guide on how to print A7 envelopes covers size-specific setup in detail.
- A2 (4.375" × 5.75") — Commonly used for RSVP envelopes and save-the-date cards.
- A6 (4.75" × 6.5") — A mid-size option for less formal invitations or enclosure cards.
- 6¾ (3.625" × 6.5") — A slim business-style option sometimes used for response cards or slim invitations.
Beyond size, paper weight and surface texture matter significantly for print quality. Smooth envelopes in the 24 lb to 28 lb range feed through most printers without issue. Heavily textured linen or cotton envelopes are beautiful but can cause uneven ink absorption on inkjet printers — ink tends to pool in the texture valleys rather than sitting uniformly on the surface.
Flap style is another variable to consider. Square-flap and baronial-style envelopes have a different thickness profile than standard pointed flaps. This affects how they feed through the printer's rollers. Always check your printer's manual for guidance on non-standard envelope styles.
According to the USPS Domestic Mail Manual, addressed envelopes must meet specific size and aspect ratio requirements to qualify for standard First-Class Mail rates — worth checking before finalizing your envelope order.
Which Printer Works Best
Both inkjet and laser printers can handle wedding envelopes. Each has genuine strengths and real limitations. Here's a side-by-side look:
| Printer Type | Best For | Key Limitations | Volume Suitability |
|---|---|---|---|
| Inkjet | Color addresses, decorative script fonts, small-to-medium runs | Slower drying; smudging risk on coated or textured envelopes | Up to ~300 envelopes per session |
| Laser | Crisp black text, high-volume runs, faster throughput | Heat can warp thin envelopes; toner can crack on fold lines | 300+ envelopes efficiently |
| All-in-One Inkjet | Home use, occasional printing, mixed media projects | Variable envelope feed depending on model; check specifications | Small to medium runs |
| Thermal / Label | Address labels only (not direct envelope printing) | Not suitable for printing directly on envelope surface | N/A for direct printing |
Pro tip: If you're printing with an inkjet, look for envelopes labeled "inkjet-compatible" — their slightly more porous coating absorbs ink faster and substantially reduces the risk of smearing.
Your Pre-Print Checklist: Fast Wins Before You Start
The single most effective thing you can do before printing wedding envelopes is prepare thoroughly. Most printing disasters happen because someone skipped the setup stage. A 15-minute preparation session can save hours of reprinting later.
Gathering Your Supplies
Collect everything you need before you start the job:
- Your wedding envelopes — order at least 10–15% more than the guest count to allow for test prints and mistakes
- A printer with adequate ink or toner (check levels before starting)
- Plain copy paper cut to the approximate size of your envelopes for test prints
- A word processor or design application with your address template ready
- Your complete, proofread guest address list
- A ruler or calipers to verify your envelope's exact dimensions
- A clean flat surface to stack finished envelopes while ink dries
You don't need professional design software. Microsoft Word, Google Docs, and Canva all support custom document sizes, which is how you set up envelope printing properly. The critical step is setting your document's page size to exactly match your envelope dimensions before you place a single text element. If the page size is wrong, nothing will align correctly no matter how you adjust the margins.
Font choice matters at this stage too. Script fonts are popular for wedding stationery and look elegant on screen. But thin script strokes can print faintly or appear broken at small sizes on some inkjet printers. Always print a test at actual size — 100% scale — before finalizing your font selection.
Running a Test Print
Never print your entire envelope run without testing first. Follow this sequence:
- Cut a sheet of plain copy paper to the exact dimensions of your envelope.
- Print one test copy on that paper using your template.
- Hold the printed sheet over an actual envelope and hold both up to a light source — you'll see immediately whether the address lands in the right position.
- Adjust margins or text block positioning in your template based on what you observe.
- Print a second test if you made changes.
- Only once the alignment is accurate on plain paper, load a single real envelope and print one more test.
- Check that test envelope carefully, then proceed with the full batch.
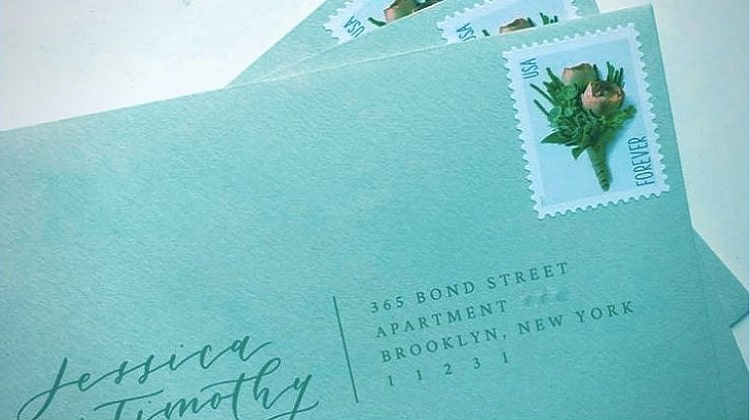
Pay particular attention to two zones: the return address placement in the upper left corner, and the recipient address block in the lower center. Both should sit at least 0.5" from any envelope edge. The recipient address should not extend into the lower right corner, which postal machines use for their own barcodes and processing marks.
This alignment process is similar to what you'd go through when printing flat media like postcards. Our guide on how to print postcards goes deeper on margin and alignment logic if you want additional context.
Building a Reliable Wedding Envelope Printing Workflow
If you're printing for a single wedding, a careful one-time setup is enough. But if you're regularly handling invitations for family, friends, or as a small side business, building a repeatable, documented workflow pays dividends in saved time and consistent results every time.
Creating and Using Templates
A solid template is the backbone of efficient envelope printing. Here's what every well-built wedding envelope template should include:
- Exact page dimensions matching the envelope size — set this first, before anything else
- A recipient address text block with locked font, size, and line spacing settings
- A return address block in the upper left corner or positioned for the envelope flap on formal invitations
- Safe-zone guide lines showing the minimum margin on all four sides
- Clear typographic hierarchy — guest name on the first line, street address on the second, city/state/zip on the third
- A locked background or placeholder layer (in Canva or InDesign) to prevent accidental edits when entering individual addresses
Once you've created a template that prints correctly, save it as a master file. For future projects — other weddings, formal parties, or any occasion requiring addressed envelopes — you duplicate the master and swap in new details. This is the foundation of a long-term strategy for printing wedding envelopes consistently and efficiently.
When selecting your typography, consider how your font choice reads at actual print size. A 12pt font that looks bold on a 27-inch monitor may appear delicate and hard to read on a printed envelope in a guest's hand. Err toward slightly larger font sizes than you think you need, especially for older guests.
Managing a Large Print Run
Printing 200 or more envelopes in one session requires logistical planning beyond just loading paper. A systematic approach prevents errors from compounding across the run.
- Clean and sort your address list first. Remove duplicates, verify spelling of unusual surnames, and confirm all addresses are complete with zip codes before you print anything.
- Set up mail merge. Both Microsoft Word with Excel and Google Docs with Sheets support envelope mail merge. The merge pulls each address automatically into your template — eliminating manual retyping for every envelope and the errors that come with it.
- Print in batches of 20–30 envelopes rather than loading the entire stack at once. This reduces jam risk and lets you catch any alignment drift before it ruins a large portion of your run.
- Allow drying time between batches. After each batch, lay envelopes face-up on a flat surface for at least 10 minutes before stacking. Inkjet ink that hasn't fully cured will transfer to the back of the next envelope laid on top of it.
- Conduct a visual check of every finished envelope before sealing. Look for smudging, misalignment, light spots from low ink, or any envelopes that fed crooked. Catching these now is far less stressful than discovering them after sealing.
- Set aside clearly marked rejects as you go — don't mix them back into the stack by mistake.
Mail merge is worth learning even if you're only printing for one event. The time investment in setting it up pays back immediately on any list longer than 30 addresses.
Keeping Your Printer Ready for the Job
A printer that performs flawlessly on everyday paper can behave unpredictably with envelopes. Envelopes are stiffer, thicker at the folds, and sometimes have moisture from the adhesive seal area — all of which affect feeding and print quality. A maintenance check before your print run eliminates most preventable problems.
Printhead and Feed Maintenance
Before loading your first envelope, work through this pre-run maintenance list:
- Run a nozzle check. Most inkjet printers include a diagnostic test that prints a grid pattern. If you see broken lines or gaps, run a printhead cleaning cycle and retest before printing on envelopes.
- Check ink or toner levels. Running out mid-job means the remaining envelopes print with faded addresses — and you may not notice until you've sealed them.
- Clean the paper feed rollers. Use a slightly damp lint-free cloth to wipe the rubber rollers inside the paper tray area. Dust and paper residue accumulate over time and cause misfeeds, especially with the stiffer material of envelopes.
- Clear the output tray and input area of any paper scraps or debris that could interfere with feeding.
- If your printer offers a straight paper path option (a rear output slot common on many inkjet models), use it for envelopes. The straight path reduces the bending the envelope travels through, which prevents curling and fold-line creasing in the printed area.
Storing Envelopes Before and After Printing
How you store your envelopes — both before and after printing — has a direct impact on print quality and the longevity of the finished addresses.
Before printing:
- Store unprinted envelopes flat in a sealed bag or box, away from humidity and heat sources.
- Wavy or damp envelopes feed poorly and print unevenly. If your envelopes have been stored somewhere humid, allow them to flatten under a heavy book for 24 hours before printing.
- Bring envelopes to room temperature before printing. Cold envelopes can develop condensation inside the printer, causing ink to spread unpredictably.
After printing:
- Lay printed envelopes face-up and flat while the ink dries — never stack them while still wet.
- Don't seal envelopes immediately after printing. Moisture from licking or a damp sponge can cause fresh inkjet ink to smear on contact.
- Store finished envelopes flat in a clean box, away from direct sunlight, until you're ready to insert invitations.
Care reminder: Humidity is one of the biggest threats to freshly printed envelopes. Store them flat in a dry room and wait at least 15 minutes before stacking or handling to prevent ink transfer between sheets.
Solving Common Wedding Envelope Printing Problems
Even with careful preparation, you may run into issues. Here's how to diagnose and resolve the most frequent problems that come up when you're figuring out how to print wedding envelopes on your specific setup.
Paper Jams and Feed Errors
Envelopes jam more often than flat paper because of their uneven profile. The folded seams create a thickness step that rollers can catch on, particularly at the leading edge.
If you're getting jams, try these fixes in order:
- Load envelopes in small groups of 5–10 instead of a full stack.
- Make sure all envelope flaps are flat and fully closed before loading.
- Fan the envelopes briefly before placing them in the tray — this separates stuck envelopes and reduces static.
- Check your printer manual for the correct envelope feed orientation for your specific model. Some printers prefer flap-side up, others flap-side down, and some require the short edge leading into the feed mechanism.
- If your printer has a manual feed slot or rear-load tray, switch to that. It usually provides a straighter paper path with less sharp bending, which is exactly what envelope printing benefits from.
- Reduce your print speed in the printer settings dialog if the option exists — slower feeding gives rollers more grip time on thicker media.
Smudging and Alignment Issues
Smudging is the most frustrating envelope printing problem, and it almost always comes down to one of three causes: wrong printer settings, incompatible envelope surface, or insufficient dry time.
- Switch to "envelope" or "thick paper" mode in your printer's settings panel. This often reduces ink volume per pass and adjusts the drying time built into the print cycle.
- If your envelope has a textured or linen finish, ink may not absorb uniformly. Run one test envelope before committing to the full batch.
- For laser printers, toner cracking at the fold line happens when the envelope is too thin or not rated for laser use. Choose envelopes specifically marked as laser-compatible.
- If smudging persists on an inkjet, consider whether your printer uses dye-based or pigment-based ink. Pigment ink sits on the surface rather than soaking in, dries faster, and is more smear-resistant on coated or semi-coated papers.
Alignment issues are almost always a document setup problem, not a printer problem. If your text keeps printing off-center or too high or low:
- Verify that your document page size matches the physical envelope dimensions exactly — even 1/8" off causes visible misalignment.
- Check whether your software is applying automatic scaling. Many word processors have a "fit to page" or "scale to fit" setting that can silently resize your layout.
- Print a fresh test on plain paper after any template adjustment — don't go straight to a real envelope.
Wedding Envelope Printing Mistakes to Avoid
Most envelope printing disasters are predictable — and preventable. The mistakes below consistently trip up first-timers and occasional printers alike.
Setup and Design Errors
- Wrong document size. Setting your page to Letter (8.5" × 11") and then trying to print on a 5.25" × 7.25" envelope almost always produces misaligned results. Set the page to match the envelope before you design anything.
- Choosing an overly decorative script font that looks elegant on screen but becomes illegible when printed at 11pt on a physical envelope. Always proof at 100% scale on paper before finalizing.
- Placing text too close to the envelope edge. Postal processing machines need clear margins to apply routing barcodes — addresses placed too low or too far to the right can get partially overwritten or flagged for manual processing.
- Skipping proofreading. One misspelled guest name on 200 printed envelopes is not a small problem. Have a second person review your full address list before printing begins.
- Forgetting to decide on return address placement before designing. On formal wedding invitations, the return address traditionally goes on the envelope flap — but that requires a different template layout than placing it on the front upper left. Decide first and build the template around that choice.
Printing Process Missteps
- Skipping the test print. This is the most common — and most avoidable — mistake. Always run a plain-paper test before touching a real envelope.
- Overloading the paper tray. Printing 50 envelopes as one unbroken batch invites jams and misfeeds. Print in small groups of 20–30.
- Sealing envelopes immediately after printing. Moisture from the adhesive activates ink that hasn't fully dried, causing smearing on the inside of the flap and the back of the envelope body.
- Ignoring the media type setting in your printer dialog. Using "plain paper" mode for everything sometimes works — but selecting "envelope" or "thick paper" mode produces more consistent results and reduces ink bleed on absorbent papers.
- Not ordering enough envelopes. Budget for at least 10–15% more than your actual guest count. Between test prints, alignment checks, and the occasional jam or feeding error, you will use more envelopes than the final number you mail.
Important: Never seal envelopes right after printing with an inkjet — the moisture from the adhesive can smear addresses that look dry but haven't fully cured. Give them at least 20 minutes before sealing.
Frequently Asked Questions
Can any home printer print wedding envelopes?
Most home inkjet and laser printers support standard envelope sizes. Check your printer's specifications for the minimum and maximum supported media sizes — very small RSVP envelopes or unusually large outer envelopes may fall outside some printers' accepted range. When in doubt, check the product manual or manufacturer website before purchasing your envelopes.
What font works best for printing wedding envelope addresses?
Clean serif fonts like Garamond, Cormorant, or Georgia read well at print size and suit formal invitations. Script fonts are popular for adding elegance but require testing at actual print size before committing — thin strokes can appear broken or faint on some printers. Aim for at least 11–12pt font size for recipient addresses to ensure readability.
Should I use an inkjet or laser printer for wedding envelopes?
Inkjet printers are better for color addressing, decorative typography, and smaller runs. Laser printers are more efficient for large all-black-text runs and generally produce sharper text at high volume. Either option works well — the key variable is choosing envelope paper that's compatible with your printer type and testing before the full run.
How do I set my document size for envelope printing in Word or Google Docs?
In Microsoft Word, go to Layout → Size → More Paper Sizes and enter your envelope's exact width and height. In Google Docs, go to File → Page Setup → Custom and enter the dimensions. Set these values before placing any text. Then position your address text blocks with appropriate margins and run a plain-paper test print to verify alignment.
Why does my printer keep jamming when I feed envelopes?
Jams usually happen because envelopes are loaded incorrectly, flaps aren't fully flat, or too many envelopes are stacked at once. Load envelopes in small groups of 5–10, check your printer manual for the correct feed orientation for envelopes, and use the manual or rear feed slot if your printer has one — it provides a straighter path with less mechanical bending.
Can I print wedding envelope addresses in a color other than black?
Yes — inkjet printers handle colored addressing well. Choose a color with strong contrast against your envelope (deep navy, forest green, or burgundy on white envelopes all read well). Avoid very light colors on white or cream envelopes. Always print a test envelope in your chosen color before running the full batch, since screen colors and print colors often differ.
How do I stop ink from smudging on my printed envelopes?
Use envelopes labeled inkjet-compatible if you're using an inkjet printer, select the "envelope" or "thick paper" media setting in your printer software, and allow at least 15–20 minutes of drying time before handling or stacking. Avoid touching the printed area immediately after printing. If smudging persists, try printing at a lower resolution or with reduced ink density settings.
Is it better to print wedding envelopes at home or use a professional printing service?
Home printing is generally more cost-effective for small to medium quantities and gives you full control over timing and adjustments. Professional services become worthwhile for very large runs (500+), specialty finishes like foil stamping or letterpress, or when you want guaranteed results without the setup effort. Compare the per-unit cost at your specific quantity before deciding.
Next Steps
- Measure your envelopes with a ruler and set your document page size to match those exact dimensions before building your address template.
- Run a nozzle check and wipe down your printer's feed rollers — take five minutes now to avoid a jam mid-run later.
- Build your guest address list in a spreadsheet and set up a mail merge so you can print all envelopes without manually entering each address.
- Cut plain paper to envelope size and print three to five test copies — verify alignment by holding the test sheet over a real envelope against a light source before loading any real envelopes.
- Order 10–15% more envelopes than your guest count so you have enough buffer for test prints, setup waste, and any feeding errors during the run.


About Chris & Marry
Chris and Mary are a couple with a shared background in graphic design and print production who have spent years working with printers across creative and professional contexts — from art printing and photo output to label production and professional document work. Their combined experience evaluating printer performance, color accuracy, and paper handling across inkjet and laser platforms gives them a practical, hands-on perspective on what makes a printer worth buying. At ShopChrisAndMary, they cover printer reviews, buying guides, and recommendations for artists, photographers, and professional users.
Time to get FREE Gifts. Or latest Free printers here.
Disable Ad block to reveal all the info. Once done, hit a button below