How to Use an Old Parallel Port Printer with a USB Adapter
by Chris & Marry
Your storage room probably has a story like this one: a perfectly good laser printer, built like a tank, collecting dust because it has a parallel port and your new laptop has nothing but USB slots. You are not alone in this situation. Connecting a parallel port printer USB adapter to breathe new life into that machine is easier than you think, and this guide from our printing tips collection walks you through every step. Whether you are a hobbyist protecting a beloved machine or a small office running on a tight budget, the path forward is clear.
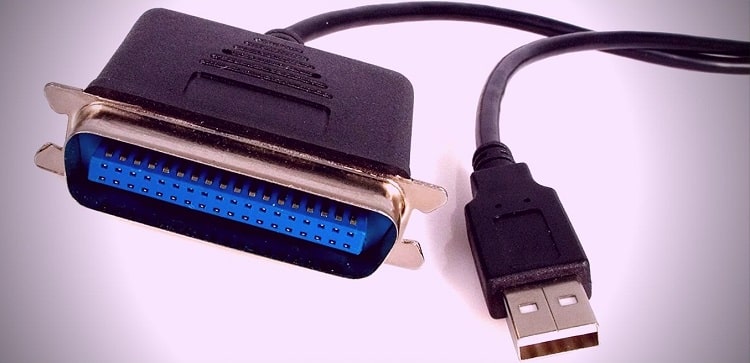
Before parallel ports disappeared from personal computers in the early 2000s, they were the dominant standard for connecting printers. That old HP LaserJet or Epson dot-matrix you have in storage still produces crisp, reliable output — the hardware is not the problem. The missing link is simply the right adapter and a driver you can actually locate and install.
In the sections below you will learn exactly what hardware to buy, how to install it correctly, and how to keep the setup stable for years of continued use.
Contents
- What You Need to Get Started
- Why Parallel Port Printers Still Deserve a Second Look
- Step-by-Step Setup for Your Parallel Port Printer USB Adapter
- Making the Connection Last
- Keeping Your Old Printer Running Smoothly
- What This Setup Actually Costs You
- USB Adapter vs. Print Server: Which Route Should You Take?
- Next Steps
What You Need to Get Started
Before you buy anything, take stock of what you are working with. The printer itself needs to be in working condition — run a self-test page if you can still connect it to an older machine. You also need to confirm that a driver exists for your current operating system. Manufacturers rarely update drivers for legacy hardware, but community repositories and archived manufacturer pages often carry exactly what you need.
Choosing the Right Adapter
Not all parallel-to-USB adapters are equal. Look for a chipset from a reputable brand — Plugable, StarTech, and IOGear make adapters that work consistently with Windows 10 and 11. Cheap no-name adapters on auction sites frequently use unreliable chipsets that cause intermittent disconnects or refuse to install at all. Spend the extra few dollars on a known brand. The adapter cable runs from the printer's 36-pin Centronics connector on one end to a standard USB-A or USB-C plug on the other. Confirm which connector your printer uses before ordering.
Where to Find Drivers
Your printer's original installation CD is almost certainly useless on a modern machine. Go directly to the manufacturer's support page and search by exact model number. For very old LaserJets, HP's legacy driver archive is surprisingly comprehensive. Epson and Brother maintain similar archives for their older machines. If the official page comes up empty, sites like Driverscape aggregate legacy drivers — always scan any downloaded file before running it.
Why Parallel Port Printers Still Deserve a Second Look
Parallel port printers built in the 1990s and early 2000s were engineered to last decades. Many used a bidirectional IEEE 1284 interface, a standard defined by the IEEE 1284 specification that allowed two-way communication between printer and computer. That robust design means the hardware itself rarely fails. What fails is the connection ecosystem around it — and that is exactly the problem a USB adapter solves.
The real reason these machines are worth saving comes down to print quality and cost per page. Many parallel-port laser printers produce text output that rivals modern machines at a fraction of the toner cost. If you print high volumes of documents — invoices, manuscripts, reference materials — reviving one of these workhorses is a smart financial decision. There is also a sustainability argument: manufacturing a new printer consumes raw materials and energy. If an adapter costing under twenty dollars keeps a functional machine out of a landfill for another five years, that is a meaningful win.
Our guide on what to do when your computer recognizes the printer but it won't respond covers several closely related troubleshooting scenarios you may encounter during this process, so bookmark it before you start.
Step-by-Step Setup for Your Parallel Port Printer USB Adapter
This is where the work actually happens. The process is straightforward once you understand the correct sequence: install the driver first, then connect the hardware, then reassign the port. Skipping steps or doing them out of order is the most common reason setups fail on the first attempt.
Installing the Driver
Start with the driver before you plug in anything. Open Device Manager and confirm no legacy printer entries are lurking from previous installation attempts — remove them if they exist. Then run the driver installer from the manufacturer's site. When the installer prompts you to connect the printer, plug the USB adapter into your computer first, then connect the other end to the printer. Windows detects the adapter and associates it with the driver you just installed. If Windows assigns the connection to a port labeled USB001 or USB002 instead of LPT1, that is completely normal and exactly what the next step addresses.
Changing the Port Assignment in Windows
Open the Printers and Scanners section in Settings, click your printer, then select Printer Properties. Under the Ports tab you will see the currently assigned port. If it reads LPT1 but the adapter is communicating over USB001, check the USB001 box and click Apply. Print a test page immediately to confirm the change took effect. The steps are identical on Windows 10 and Windows 11. If you run into spooler errors during this process, our article on how to fix a printer spooler error covers every common cause and resolution.
Pro tip: Always print a test page right after changing the port assignment — it confirms the connection is working before you spend time troubleshooting the wrong problem.
Making the Connection Last
A successful first-time setup is not enough if you want consistent results day after day. The biggest threat to a stable parallel-to-USB connection is the adapter being reassigned to a different device entry every time you unplug it. Windows treats each physical USB port as a separate entry in the device registry, so the adapter in your left USB slot gets a different identifier than the same adapter plugged into the right slot.
The fix is simple: always plug the adapter into the same USB port on your computer. Put a small piece of colored tape next to the port and label it. If you ever move the setup to a new machine, repeat the driver installation and port-assignment steps from scratch — do not assume that settings transfer automatically. For anyone sharing a printer across multiple computers, our guide on how to connect two computers to one printer using USB gives you a reliable framework to adapt. The same port-stability principle applies across every machine in the setup.
Keeping Your Old Printer Running Smoothly
Hardware that has sat idle for years needs attention before it earns daily-driver status again. Laser printers need a drum and toner check — if the drum has been exposed to direct light for extended periods, it may produce streaked output regardless of adapter quality. Dot-matrix printers need fresh ribbon cartridges, which are still widely available for most Epson and OKI models at reasonable prices.
Cleaning and Inspection
Open the printer and vacuum out any accumulated dust before the first print job. Paper dust and debris around the paper path cause more jams on older machines than any other single factor. Wipe the rollers with a lint-free cloth lightly dampened with isopropyl alcohol and let them dry completely before feeding paper through. A clean paper path is the difference between a machine that jams constantly and one that runs reliably for years.
Toner and Consumables
Toner cartridges for older HP LaserJet models are still widely available from third-party suppliers at low cost — often under twenty dollars for a cartridge that prints thousands of pages. Confirm compatibility by cross-referencing your printer's model number with the cartridge part number before purchasing. Generic toner quality has improved considerably; reputable brands like LD Products and CompAndSave deliver consistent results at a fraction of OEM prices.
What This Setup Actually Costs You
One of the strongest arguments for reviving a parallel port printer is the economics. Here is a realistic breakdown of what you can expect to spend compared to buying new:
| Item | Parallel Port Revival | New Entry-Level Laser Printer |
|---|---|---|
| Hardware cost | $0 (printer already owned) | $60–$100 |
| USB adapter | $10–$20 | Not applicable |
| Driver (if paid) | $0–$10 (usually free) | Included |
| Replacement toner | $10–$25 (generic) | $30–$55 (OEM or generic) |
| Total first-year cost | $20–$55 | $90–$155 |
| Pages per toner cartridge | 2,000–6,000+ | 1,000–3,000 (starter cartridge) |
The numbers make a compelling case. Your parallel port machine, already paid for, needs only an adapter and occasionally a generic toner replacement. Total investment stays under fifty-five dollars in most cases — roughly half the cost of an entry-level replacement printer that comes with a half-filled starter cartridge.
USB Adapter vs. Print Server: Which Route Should You Take?
If you need to connect the parallel port printer to a network rather than a single computer, a dedicated print server is the alternative to a USB adapter. Both approaches work, but they solve different problems. Here is a side-by-side comparison to help you decide:
| Factor | USB Adapter | Parallel Print Server |
|---|---|---|
| Cost | $10–$20 | $30–$80 |
| Setup complexity | Low — driver + port reassignment | Medium — network config required |
| Number of users | One computer at a time | Multiple devices simultaneously |
| Wireless access | No | Yes (Wi-Fi models) |
| Best for | Single-user home or home office | Small office with shared printer needs |
| Driver requirement | Printer driver on each PC | Printer driver on each PC |
For single-computer use, a USB adapter is faster to set up and significantly cheaper. For a household or small office where multiple devices need access, a print server like those from Netgear or a Raspberry Pi running CUPS gives you wireless access from any device on the network. The trade-off is configuration complexity: a print server requires network setup and occasionally a manual restart after firmware updates change settings unexpectedly.
Next Steps
- Run a self-test page on your parallel port printer to confirm it is mechanically functional before purchasing any adapter.
- Search your printer's exact model number on the manufacturer's support site and download the driver for your version of Windows before connecting any hardware.
- Order a reputable parallel-to-USB adapter from Plugable, StarTech, or IOGear — budget fifteen to twenty dollars for a reliable chipset.
- Follow the driver-first installation sequence, then reassign the printer port from LPT1 to USB001 in Printer Properties and print a test page to confirm.
- Label the specific USB port you use for the adapter with tape so the connection stays consistent and you never need to reassign the port again.



About Chris & Marry
Chris and Mary are a couple with a shared background in graphic design and print production who have spent years working with printers across creative and professional contexts — from art printing and photo output to label production and professional document work. Their combined experience evaluating printer performance, color accuracy, and paper handling across inkjet and laser platforms gives them a practical, hands-on perspective on what makes a printer worth buying. At ShopChrisAndMary, they cover printer reviews, buying guides, and recommendations for artists, photographers, and professional users.
Time to get FREE Gifts. Or latest Free printers here.
Disable Ad block to reveal all the info. Once done, hit a button below