Scrapbooking generates over $2.5 billion in annual sales across North America alone — proof that preserving memories in a handcrafted album never goes out of style. If you want to learn how to make a homemade scrapbook, you're joining millions of people who turn everyday photos, ticket stubs, and handwritten notes into something permanent and personal. This guide walks you through everything from picking an album to finishing your final page. For photos that really hold their color over time, pairing your project with a quality art and craft printer gives your pages a professional edge right from the start.
Scrapbooking sits at the crossroads of photography, journaling, and visual design. A finished book tells a story in a way that a phone album simply can't — you feel the texture, read the handwritten captions, and hold the memories in your hands. Unlike a digital file that disappears when a hard drive fails, a well-made scrapbook can last generations.
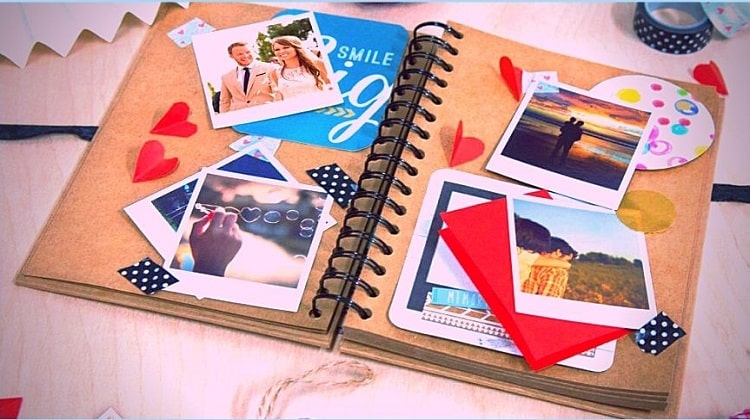
Your first scrapbook doesn't need to be perfect. Most experienced crafters will tell you their early pages look nothing like what they make today. That's not a flaw — that's the craft growing with you. The important thing is to start.
Contents
The Roots of a Timeless Craft
How Scrapbooking Evolved Over the Centuries
The modern scrapbook has a surprisingly deep history. According to Wikipedia, the practice traces back to 15th-century England, when people kept "commonplace books" — personal collections of quotes, poems, recipes, and pressed flowers. By the Victorian era, decorative albums filled with ephemera, calling cards, and die-cuts had become fashionable in middle-class homes. Photography changed everything in the late 19th century, giving everyday families a compelling reason to maintain dedicated photo albums.
The craft took a dramatic commercial turn in the 1980s and 1990s when hobbyists began selling page-preservation kits and acid-free products at specialty stores. What had been a casual pastime became a structured, product-driven industry. Craft chains dedicated entire aisles to it, and scrapbooking conventions drew tens of thousands of attendees each year.
Why the Craft Has Stayed Popular
Digital photography made it easier to take thousands of photos, but it also made it easier to never look at them again. A physical scrapbook solves that problem by requiring curation. You choose what matters, arrange it thoughtfully, and create something with a beginning, middle, and end. That intentionality is a large part of why the craft has outlasted early predictions that social media would make it obsolete. There's simply no digital equivalent of turning a physical page.
Choosing Supplies That Match Your Vision
Albums, Paper, and Adhesives
Your supply list doesn't need to be long, but each item matters. Start with an album that suits your preferred page size — 12x12 inches is the industry standard and gives you the most layout flexibility, while 8x8 albums work well for travel or gift books. Acid-free and lignin-free materials are non-negotiable if you want your pages to last more than a decade without yellowing or becoming brittle.
For paper specifically, understanding weight and finish is worth your time. Our full guide on scrapbook paper types, sizes, and weights covers everything you need to make smart choices at the craft store. In short: cardstock (65–80 lb) works for backgrounds and structural layers, while patterned paper (usually 60 lb text weight) is better for decorative overlays.
Adhesives fall into three main categories: liquid glue (precise but slow-drying), tape runners (fast and clean for photos), and photo corners (archival-safe and fully reversible). Each has its place depending on what you're attaching and whether you want the option to reposition later.
| Supply | Best For | Watch Out For |
|---|---|---|
| 12x12 Album | Standard layouts, most embellishments | Heavy pages can stress the binding over time |
| Cardstock (65–80 lb) | Backgrounds, layering, die cuts | Must be acid-free and lignin-free |
| Tape Runner | Mounting photos quickly and cleanly | Low-tack versions allow repositioning |
| Photo Corners | Vintage look, reversible adhesion | Not suitable for heavy 3D embellishments |
| Page Protectors | Sealing and protecting finished layouts | Use polypropylene only — avoid PVC |
| Archival Pen | Journaling, labeling, edge inking | Check for acid-free and waterproof ratings |
Optional Tools That Speed Up the Process
A paper trimmer with a sliding blade gives you clean, straight cuts without guesswork. A corner rounder softens photo edges for a polished look in seconds. Ink pads and stamp sets add texture quickly without requiring design skills. None of these are strictly necessary, but each one removes a frustration point once you start building pages regularly. Buy them one at a time as you identify which steps feel awkward rather than buying a full kit upfront.
How to Make a Homemade Scrapbook, Step by Step
Planning Your Theme and Layout
Before you touch a single sheet of paper, decide on a theme. A focused scrapbook — a vacation, a child's first year, a friendship timeline — is far easier to design than a random collection of photos. Your theme drives your color palette, your paper patterns, and the tone of your journaling. Trying to document everything at once leads to the most common beginner mistake: the unfinished scrapbook sitting in a drawer.
Sketch a rough layout for each page before committing to adhesive. Most strong layouts follow a simple visual hierarchy: background paper first, then photo placement, then embellishments, then journaling. Leave breathing room around your photos rather than filling every inch of the page, and the layout will read as intentional rather than cluttered.
Building and Finishing Your Pages
Start with your background paper and trim it to fit the album page. Layer secondary papers or torn-edge accents for depth. Position your photos before gluing anything — move them around until the balance feels right. Only then adhere them permanently. This single habit prevents more wasted paper than any other technique.
Journaling is often the last thing people do, but it may be the most important element on the page. A photo without context fades in meaning over time. Write who, what, where, and when — even a single sentence per page is enough to anchor the memory decades later. Use an archival-quality pen rated for acid-free and waterproof performance.
Beginner Projects vs. Advanced Techniques
Where to Start If You're New
If this is your first scrapbook, start with a coordinated paper kit. Most craft stores sell bundled packs with matching papers, stickers, and embellishments designed to work together — this removes the intimidating task of matching colors and patterns on your own. Pick 20 to 30 photos from a single event and commit to a small album format so you can actually finish the project in a reasonable timeframe.
Keep embellishments minimal at first. One or two accent pieces per page look cleaner than a page packed with competing elements. As you complete more pages, you'll develop a natural instinct for balance and spacing. If you want to add printed stickers or custom journaling tags, our review of the best sticker papers for home printers covers which options work reliably without smearing or curling.
Skills That Take Practice to Master
Once you're comfortable with basic layouts, techniques like layered die cutting, watercolor washes, and mixed-media collaging open up a new range of creative possibilities. These approaches take time to learn — watercolor reacts differently on different paper stocks, and layered die cuts require precise alignment to look deliberate rather than accidental.
Advanced crafters also experiment with texture: inking edges, distressing paper with sandpaper, or adding dimensional foam dots to raise embellishments off the page surface. Heat embossing is another popular advanced technique. If you enjoy working with heat tools on craft projects, the precision and control discussed in our guide to ironing Perler beads translates directly to heat-embossing stamps and similar detail work.
Keeping Your Pages in Great Shape
Archival Standards You Should Know
The biggest long-term threat to a scrapbook is acid migration — the chemical process that causes paper to yellow and photos to fade. Acid comes from the paper itself (newsprint is notorious for this), from certain adhesives, and even from low-quality page protectors made with PVC. Every material that directly touches your photos should be labeled acid-free and, ideally, lignin-free.
Photo printing matters too. Inkjet-printed photos on standard copy paper can fade within a few years if exposed to UV light or humidity. If you're printing your own photos at home, use dedicated photo paper and a printer tested for color longevity. The difference between a photo that lasts five years and one that lasts fifty often comes down to these material choices.
Storage and Long-Term Handling
Store finished scrapbooks upright on a shelf, away from direct sunlight and humidity — the same conditions that damage books apply here, and a dark, cool closet is far better than a bright display shelf for long-term preservation.
If you're stacking albums, lay them flat and don't pile more than two or three high — the weight stresses bindings and crushes dimensional embellishments over time. Handle pages with clean, dry hands. For albums containing original photographs that can't be reprinted, cotton gloves add an extra layer of protection against oils from your skin.
When Something Goes Wrong
Fixing Faded or Bleeding Photos
If a printed photo has faded, the most practical fix is to reprint it. If the original digital file is gone, a scanning service can recover reasonable quality from the original print. For ink bleed — where inkjet ink has smeared across adjacent paper — the solution is prevention: make sure inkjet prints are fully dry before mounting, and avoid pressing pages together immediately after printing.
Photos with consistent color cast issues (too warm, too cool) can often be corrected before reprinting using free editing software. If the problem appears across multiple prints, the issue is likely the printer's color calibration rather than the source image — running the printer's built-in calibration routine often resolves it.
Dealing With Warped or Buckled Pages
Page buckling usually comes from moisture — either from wet adhesive applied too generously, humid storage conditions, or heavy inkjet ink coverage on one side of a thin paper. To flatten a buckled page, place it under a stack of heavy books for 24 to 48 hours. For more stubborn warps, lightly misting the back of the page with water and then pressing it under weight can help reset the fibers.
Prevention is simpler than correction: use adhesives sparingly, let each layer dry fully before adding the next, and store your finished album in a stable environment away from temperature swings.
Techniques That Real Crafters Swear By
Layouts That Get Noticed
Experienced scrapbookers often say their most successful layouts share one characteristic: a clear focal point. That usually means one dominant photo surrounded by supporting elements, rather than four equal-sized photos competing for attention. Choose your single best photo for the hero position and let every other element on the page serve it rather than fight it.
Color blocking is another technique worth learning early. Instead of mixing multiple patterned papers, try pairing one patterned paper with two or three solid cardstocks in coordinating colors. The result looks deliberate and polished even without complex embellishments, and it gives beginners a reliable framework before they develop a more instinctive eye for color.
Small Details That Elevate the Whole Book
Ink the edges of your cut papers. Running an ink pad lightly along the edges of background layers and photos defines each layer visually and gives the page a finished, cohesive look. It takes a few seconds and makes a visible difference. Similarly, adding machine-stitched lines across a layout — or even faux stitching drawn carefully with a pen — gives pages a handmade warmth that mass-produced elements can't replicate.
Title placement is often overlooked. A title positioned at a slight angle, or broken across two lines for visual rhythm, draws the eye in a way that a flat, centered title rarely does. Experiment with placement before committing any adhesive — the few extra minutes spent testing always pay off in a more dynamic final result.
Frequently Asked Questions
What materials do I need to start a homemade scrapbook?
At minimum, you need an album, acid-free cardstock or patterned paper, an adhesive (tape runner works well for beginners), your photos, and an archival-quality pen for journaling. Optional additions like a paper trimmer, corner rounder, and embellishment stickers make the process easier but aren't required to get started.
What size album should I choose for my first scrapbook?
A 12x12 inch album is the most popular option because it gives you the most layout space and has the widest selection of coordinating papers and embellishments. If you want something more manageable for a first project, an 8x8 album is easier to fill and still produces polished results.
How do I keep my scrapbook from yellowing over time?
Use only acid-free and lignin-free papers and adhesives throughout. Avoid PVC page protectors — polypropylene is the safe choice. Store your album away from direct sunlight, heat, and humidity. These steps prevent the chemical degradation that causes paper and photos to discolor and become brittle over the years.
Can I use a regular inkjet printer to print photos for my scrapbook?
Yes, but use dedicated photo paper and make sure the ink is fully cured before mounting. Inkjet ink on standard copy paper fades quickly and can smear onto adjacent pages when pressed together. For better color longevity, use a printer and paper combination that specifies archival or long-lasting output on the packaging.
How many photos should I put on a single scrapbook page?
One to four photos per page is the most common range among experienced crafters. Layouts built around a single dominant photo tend to have the most visual impact. Crowding more than five or six images onto one page reduces impact and leaves little room for journaling, captions, or embellishments.
How long does it take to make a homemade scrapbook?
A short album covering a single event — around 20 to 30 photos across 10 to 15 pages — typically takes several sessions of two to three hours each. More elaborate books with mixed media or detailed journaling take considerably longer. Working in focused sessions rather than attempting to finish in one sitting consistently produces better results.
Next Steps
- Choose a single event or theme and pull 20 to 30 photos from it — keeping your first project focused is the most reliable way to actually finish it.
- Pick up a coordinated paper kit at a craft store so your colors and patterns are already matched, removing the biggest decision barrier for beginners.
- Read the full guide on scrapbook paper types, sizes, and weights before buying paper in bulk, so you understand exactly what you're purchasing and why it matters for longevity.
- Run a test print of two or three photos on dedicated photo paper and let them dry fully before mounting anything — this catches printer calibration issues before they ruin a finished page.
- Sketch rough layouts for your first three pages on plain paper before cutting anything — five minutes of planning here prevents wasted materials and produces more confident, balanced designs.


About Chris & Marry
Chris and Mary are a couple with a shared background in graphic design and print production who have spent years working with printers across creative and professional contexts — from art printing and photo output to label production and professional document work. Their combined experience evaluating printer performance, color accuracy, and paper handling across inkjet and laser platforms gives them a practical, hands-on perspective on what makes a printer worth buying. At ShopChrisAndMary, they cover printer reviews, buying guides, and recommendations for artists, photographers, and professional users.
Time to get FREE Gifts. Or latest Free printers here.
Disable Ad block to reveal all the info. Once done, hit a button below