Ever wondered why your photos look incredible on screen but come out flat and washed out on paper? The answer almost always comes down to settings — and once you understand how to print photos in Windows 10 the right way, the difference is dramatic. This guide walks you through every method, setting, and common trap so your prints match what you see on your monitor. If you print photos regularly and want hardware that keeps up, our printer for professionals category is worth a look before you invest in new equipment.
Windows 10 actually gives you several ways to print a photo — the built-in Photos app, the classic File Explorer print dialog, and third-party software like Lightroom or GIMP. Each one suits a different situation, and the right choice depends on how much control you want over the final output. Knowing which tool to reach for is half the battle.
Color accuracy, paper type, resolution, and printer settings all contribute to your final result. We've seen beautiful digital shots ruined by a single wrong checkbox in the print dialog. So let's walk through everything — step by step — so you can send any photo to your printer with confidence.
Contents
- Step-by-Step: How to Print Photos in Windows 10
- Comparing Your Windows 10 Photo Printing Methods at a Glance
- Tips for Getting Better Photo Prints
- Photo Printing Mistakes That Quietly Ruin Your Results
- Home Printing vs. Print Shop: Weighing Your Options
- Building a Photo Printing Workflow That Holds Up
- Frequently Asked Questions
Step-by-Step: How to Print Photos in Windows 10
Windows 10 has two solid built-in options for printing photos — the Photos app and the File Explorer print dialog. Both are free, both work without extra software, and they each have their strengths. Here's how to use them.
Using the Windows Photos App
The Photos app is the quickest route for casual prints. It's already installed, it's clean to use, and it handles most everyday jobs without any setup. Here's the process:
- Open the Photos app from the Start menu, or just double-click any photo file on your PC.
- Click the three-dot menu (⋯) in the top-right corner and select Print.
- Choose your printer from the dropdown — double-check this if you have more than one connected.
- Select your paper size (4×6, 5×7, 8×10, or custom) and your preferred print quality.
- Under the "Fit" option, decide whether you want the photo to fill the entire page or fit within the margins with white borders.
- Hit Print and you're done.
The Photos app is perfect for quick snapshots and smaller prints. It won't give you deep color profile controls, but for family photos or casual prints it's fast and reliable. If you're printing on specialty media like glossy sheets, our guide on how to print on glossy paper covers exactly what to adjust before you send the job.
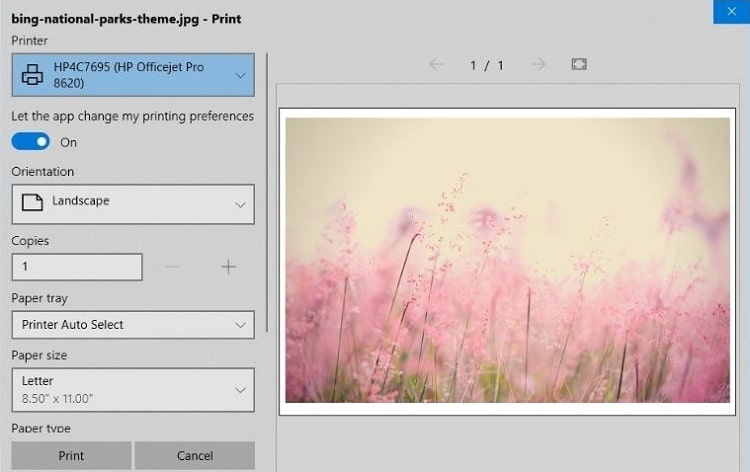
Printing Through File Explorer
For more control — especially over paper type, print density, and layout — the File Explorer print dialog is the better choice. Here's how to get there:
- Right-click the photo file in File Explorer and select Print from the context menu.
- The "Print Pictures" window opens. Choose your printer, paper size, quality, and number of copies.
- Click Printer Properties to access deeper settings: paper type (glossy vs. matte), borderless printing, and color management modes.
- Preview the layout on the right side of the window. You can tile multiple photos per page here too.
- Click Print when you're satisfied with the preview.
This method shines when you're using a dedicated photo printer with its own driver settings. And if you ever need to print a large image across multiple sheets for a wall display, check out our walkthrough on how to print a picture on multiple pieces of paper — it pairs naturally with the File Explorer dialog.
Comparing Your Windows 10 Photo Printing Methods at a Glance
Not sure which approach fits your needs? Here's a quick side-by-side of the most common ways to print photos in Windows 10, so you can choose the right tool for the job without second-guessing yourself.
| Method | Ease of Use | Color Control | Best For | Cost |
|---|---|---|---|---|
| Windows Photos App | Very Easy | Basic | Quick everyday prints | Free (built-in) |
| File Explorer Print Dialog | Easy | Moderate | Paper type & layout control | Free (built-in) |
| Adobe Lightroom / Photoshop | Moderate | Advanced | Professional, color-managed prints | Subscription |
| GIMP | Moderate | Advanced | Pro-level control, no cost | Free |
| Microsoft Paint | Very Easy | Minimal | Draft checks only | Free (built-in) |
According to Wikipedia's overview of color management, the gap between screen colors and printed colors comes down to the difference between RGB (screen) and CMYK (print) color models — something worth understanding if you want consistent results across both.
Tips for Getting Better Photo Prints
Knowing the steps gets you started. Getting a print that actually looks great takes a few extra habits. These are the ones that make the biggest difference.
Paper and Ink Are Half the Battle
Your printer hardware matters — but so do your consumables. The wrong paper or ink can completely undermine a great photo file. Keep these in mind:
- Use photo-grade paper designed for your printer type. Standard copy paper absorbs too much ink and produces muddy, dull colors.
- Match the paper type in your printer settings. Loading glossy paper but telling the driver it's "plain paper" causes streaky, uneven results.
- Stick to genuine or high-quality compatible ink cartridges. Off-brand inks can shift colors in unpredictable ways — especially in skin tones and sky blues.
- Let inkjet prints dry for a few minutes before stacking them. Stacking too soon smears the surface and ruins the finish.
If you're working on creative projects alongside your photo prints — like scrapbooking or craft paper layouts — our guide on how to print digital scrapbook paper has paper and ink tips that apply directly to those projects too.
Dial In Your Color Settings
Color management is where most home printers fall short — not because the hardware is bad, but because the settings are fighting each other. A few things to check before every print job:
- Set the highest DPI your paper supports. For photos, your source file should be at least 300 DPI at the intended print size.
- In Printer Properties, find the color management tab. If your photo editor manages color, tell the printer to apply no color correction. If Windows manages it, let the driver handle it. Never let both manage color at the same time — you'll get double-processed, muddy output.
- Run a nozzle check if your colors look banded or patchy. A clogged print head is one of the most common causes of bad photo prints.
Pro tip: Before committing to a full-size print on expensive photo paper, always print a small cropped test section first. It takes 30 seconds and saves an entire sheet if the color balance is off.
Photo Printing Mistakes That Quietly Ruin Your Results
Even with the right method and good paper, a few common errors can still tank your output. Here are the ones worth avoiding.
Printing Low-Resolution Images
This is the most common culprit behind blurry prints — and it's completely avoidable. A photo that looks sharp on your phone screen might only be 72 DPI, which is way too low for a quality print. Before printing, check the image dimensions in pixels. For a 4×6 print, you need at least 1200×1800 pixels. For an 8×10, aim for 2400×3000 pixels minimum. If the file is smaller than that, no printer setting in the world will make it look crisp — you'll just get an enlarged, pixelated version of a small image.
Skipping the Test Print
It's tempting to go straight to the full-size print, especially when you're excited about a shot. But skipping a test print is a gamble. If the color balance is off or the crop is slightly wrong, you'll waste an entire sheet of photo paper finding out. Print a small thumbnail of your image first, check the colors and framing, adjust in your editor if needed, and then commit to the full print. That one extra step saves more paper than it uses.
Home Printing vs. Print Shop: Weighing Your Options
Not every photo belongs on your home printer. Sometimes a professional print shop is the smarter call — and sometimes it's overkill. Here's an honest look at both sides so you can decide what makes sense for your situation.
Printing at home:
- Full control over settings, paper choice, and timing
- No minimums — print a single photo whenever you want
- Ongoing ink and paper costs add up, especially for frequent large prints
- Quality varies significantly by printer model and calibration
- Convenient for quick projects and proofing before a final order
Using a print shop:
- Professional-grade color calibration and archival-quality paper
- Much better for large formats — poster size and beyond
- You give up direct control over the final output
- Per-print cost can be lower for small quantities than buying ink by the cartridge
- Best for prints you want to last decades without fading
Worth knowing: For anything larger than 8×10 — or prints you want to hold their color for 20+ years — a professional shop with pigment-based archival inks will almost always outperform a home printer, even a very good one.
Building a Photo Printing Workflow That Holds Up
Knowing how to print photos in Windows 10 is a great start. But if you print regularly — for family albums, art projects, or professional use — you need a repeatable system that keeps quality consistent without reinventing the wheel each time.
Choosing a Printer Built for Photos
Not all inkjets are created equal. A printer designed for documents will struggle with smooth color gradients and fine tonal detail. If photos are a regular priority, look for these features:
- Six or more individual ink cartridges — more color channels produce smoother transitions and more accurate skin tones.
- Support for borderless printing in the sizes you use most (4×6, 5×7, 8×10).
- A maximum print resolution of at least 4800 DPI for true photo-quality output.
- Compatibility with ICC color profiles, which let you match on-screen colors to printed output far more accurately.
Keeping Your Photo Files Organized
A smooth print workflow starts before you even open Windows — it starts with how your files are organized. Keep your photos in clearly labeled folders by date or event. Always keep the original, full-resolution file separate from edited or resized versions. When you go back to reprint something months later, you want the original file at hand, not a compressed social media export. A simple structure like Photos > Year > Month > Event Name is all you need. Consistency is what makes it work.
Frequently Asked Questions
What is the easiest way to print photos in Windows 10?
The Windows Photos app is the simplest built-in option. Open your photo in the app, click the three-dot menu, select Print, choose your printer and paper size, and hit Print. No extra software required.
How do I improve photo print quality in Windows 10?
Use photo-grade paper, match the paper type in your printer settings, set the highest print quality your printer supports, and make sure your source image is at least 300 DPI at the intended print size. Running a nozzle check before important prints also helps.
Why do my printed photos look different from what's on my screen?
Screens use RGB color (light-based) and printers use CMYK (ink-based), so some color shift is normal. To reduce the gap, calibrate your monitor, use ICC color profiles in your printer driver, and avoid letting both Windows and your photo editor manage color correction at the same time.
What DPI should I use when printing photos?
For most photo prints, 300 DPI at the intended print size is the standard target. That means a 4×6 print needs a source image of at least 1200×1800 pixels, and an 8×10 print needs at least 2400×3000 pixels.
Can I print photos in Windows 10 without installing extra software?
Yes. Both the Windows Photos app and the File Explorer right-click Print option are built into Windows 10 and require no additional downloads. They handle most everyday print jobs without any setup.
How do I print borderless photos in Windows 10?
Open Printer Properties from within the print dialog and look for a "Borderless" or "Full Bleed" option under the paper or layout settings. Not all printers support borderless printing, so check your printer's specifications first. Make sure you're also using the correct paper size that matches a supported borderless format.
Why are my printed photos coming out blurry?
Blurry prints are almost always caused by a low-resolution source image, a clogged print head, or incorrect paper type settings in the driver. Check that your image file has enough pixels for the print size you chose, run a nozzle check, and verify that your paper type setting matches what's actually loaded in the printer.
The difference between a disappointing print and a great one is almost never the printer — it's the five minutes you spend on settings before you hit Print.


About Chris & Marry
Chris and Mary are a couple with a shared background in graphic design and print production who have spent years working with printers across creative and professional contexts — from art printing and photo output to label production and professional document work. Their combined experience evaluating printer performance, color accuracy, and paper handling across inkjet and laser platforms gives them a practical, hands-on perspective on what makes a printer worth buying. At ShopChrisAndMary, they cover printer reviews, buying guides, and recommendations for artists, photographers, and professional users.
Time to get FREE Gifts. Or latest Free printers here.
Disable Ad block to reveal all the info. Once done, hit a button below